Now it's time for the for the fir Lync 2013 site. I'm following up with the Topology blog i released earlier.
I prepare the first Enterprise Server Lync 2013.
Just in the Test Lab, I don't have the Load Balance yet, so what I did was, I gave the only EE Server two IP addresses. The second one is for the POOLLEFT, this is a supported scenario if you only have single pool server in place.
First we need all the Pre-Requisites for the new EE Server in place, which I have listed here:
PowerShell 3.0
PowerShell 3.0 is not a standalone product, it's part of the Windows Framework 3.0
http://www.microsoft.com/en-us/download/details.aspx?id=29939
.Net Framework 4.5
http://www.microsoft.com/en-my/download/details.aspx?id=29909
Windows Identity Foundation
http://www.microsoft.com/en-us/download/details.aspx?id=17331
IIS
Windows Desktop Experience
SilverLight 4
Visual C++ 11 x64
Active Directory Management tools
IIS:
- Static Content
- Default Document
- HTTP Errors
- ASP.NET
- .NET Extensibility
- Internet Server API (ISAPI) Extensions
- ISAPI Filters
- HTTP Logging
- Logging Tools
- Tracing
- Windows Authentication
- Request Filtering
- Static Content Compression
- Dynamic Content Compression
- IIS Management Console
- IIS Management Scripts and Tools
- Anonymous Authentication (This is installed by default when IIS is installed.)
- Client Certificate Mapping Authentication
Note:
Dynamic Content Compression - was not in the documentationright now, be aware
Open PowerShell 3.0 and run the following command for IIS Setup:
Import-Module ServerManager
Add-WindowsFeature Web-Server, Web-Scripting-Tools, Web-Windows-Auth, Web-Asp-Net, Web-Log-Libraries, Web-Http-Tracing, Web-Stat-Compression, Web-Dyn-Compression, Web-Default-Doc, Web-ISAPI-Ext, Web-ISAPI-Filter, Web-Http-Errors, Web-Http-Logging, Web-Net-Ext, Web-Client-Auth, Web-Filtering, Web-Mgmt-Console
First the Screenshot for the Pre-Requisits:
.NET Framework 4.5 RC:


PowerShell script for IIS features:

If you start Setup.exe, it first installs the C++ Runtime:


Than it's time for the WMF 3.0 RC (PowerShell 3.0):

The Desktop Experience (you can do this via PowerShell too):

It will add the .Net FW 3.5.1 (so you remember that you can have multiple version of .NFW at the same time):

Install the Windows Identity Foundation (WIF):

---------------
Now we can finally start with the Lync Active Directory Preparation.
Therefore the First Step is to install the Administrative Tools, which you will find on the right site of the Installation Wizard:

Than as usual, we need to upgrade the Schema for Lync 2013 Preview. Since we are experienced, we want to do so via PowerShell:
Follow this command: Install-CsAdServerSchema

After the Active Directory replicated the Schema changes, we have to verify if the Schema is successful implemented.
Follow this command: Get-CsAdServerSchema

Next step is the Forest Prep:
Follow this command: Install-CsAdForest -GoupDomain LYNC15.DIR

Verify if the is action was successful too.
Follow this command: Get-CsAdServerSchema

Next step is the Forest Prep:
Follow this command: Install-CsAdDomain -GoupDomain LYNC15.DIR

Verify if the is action was successful too.
Follow this command: Get-CsAdDomain

We have to define our Topology for Lync 2013 as the next action.
Start the Topology Builder and crete a NEW TOPOLOGY. Save the config file at a proper location and start Topology definition.

As I blogged before, have a look here on how to do this step-by-step.
http://lyncuc.blogspot.com/2012/07/lync-2013-topology-builder.html

SQL Server Mirroring is on of the option i have chose for this Lab, so as an additional Pre-Requisite, we need to prepare the Share before we are able to publish the Topology.
The next screenshots will take you through the configuration for the SQL Share Folder:
The requirements for the Share a simple.
Make sure you have really access to the Share, since the NTFS permission weight is higher than the share, you can still use "Everyone", else if you are in a secure environment, follow with the Share permission the same setup as I did for the NTFS permission.
NTFS Permission:
SQL01 (Primary): you need read & write permission
SQL02 (Mirror): you need read
SQL Server Service Account: you need read & write permission
(The Service Account is not described yet in the Deployment Guides)


After the Topology is defined, you need to start preparing the SQL Server hosting the Central Management Store (CMS).
We do this also manually for Database initialization.
Follow the command: Install-CsDatabase -CentralManagementDatabase -SqlServerFqdn LYNC15SQL01.LYNC15.DIR

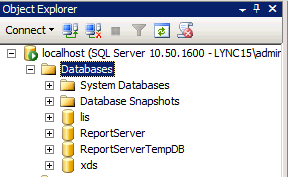
In SQL Server Management Studio, you will find the two databases:
LIS (Local Information Server)
XDS (Configuration Database)
After the Database is existing, you need to publish the Topology.
To do so, right click the root of the Topology Tree and click Publish Topology.

The Wizard will guide you through the entire process, so the topology will be written into the XDS Database.
(If you dont like PowerShell, you are able to run through the Database installation with the Wizard too, but remember if you have not install the Databases in a Default Path, or change the DP in SQL Server, you better do so with PowerShell, here are are able to specify every parameter including the Database and Log location)

Only if you have configured the SQL Server Backup Share proper, the Wizard will do nearly everything for you ;)
If you did not configure the Share Permission correctly, there is still a bug in the Lync 2013 Preview. The Wizard will run though perfectly with out giving you any error and information about the not proper configured SQL Server Mirroring. If you encounter this problem, correct your permission and follow exactly the other blog entry of mine: http://lyncuc.blogspot.com/2012/07/database-mirroring-step-by-step-lync.html
You have to define the Sahre Location in the Wizard.
Make sure you have "\\" this in front of the Server Name. Btw, the FQDN is not necessary here.

Still in Lync 2013 the same as before, the CMS will be hosted on a Enterprise Pool, since i only have the POOLLEFT, i will surely install it here:

It will take some time and you can have everything ready in around 15min.

Beautiful, it is successful.

Just having a look into the LyncShare:
Well there are some more folder compared with LYnc 2010. This is regarding the additional Services and Feature included in Lync 2013.
I will explain you all this folders functions and purposes later.

---------------------------------------------------------------------------------------------------------
The first step's for deploying Lync 2013 are done and we have now the focus on the Server Deployment itself.
Just that Lync Server 2013 will install much more Components than Lync 2010 did, if understandable due to consolidated and added features.
So don't be surprised if you will wait a little bit longer than usual.

You see the next Deployment Wizard menu, just follow the steps listed and it will lead to success.
Start with the local copy of the XDS Database, this will install a local SQL Server on every single Lync Server 2013 as a Pre-Requisite. But this is not different from Lync 2010.

Just chose the replication Source from the CMS Server Server.

As we know, the SQL installation will take really some time and you dont see and progress at all.
What you have to do is, open the Task Manager and follow the activity of the SQLEXPR_x64.exe, which is the installer for SQL Server Express. (Funny is, this is a 32bit installer.. Good question why?)

Next you are ready to install Lync Server Components, based on the Topology Definition you have done earlier.

Always necessary and an important configuration is are the Certificates.
What you still find in Lync 2013 are the Mobility Features included. So you don't have to do the same as in Lync 2010, because it is integrated.

Next we have to assign the Certificates:

And start the Services:


I hope this overview helps you setting up our first Server, don't forget all the other DNS entries and than you have a lot of work ahead if you start configuring Lync.
Truly out of the box, even with Lync Std Edt, you can start working. But Lync 2013 has so so so many new features, you need time to dig through all of them. Here is still room to blog a lot.
Just continue and follow me, I will bring you deep into the Lync 2013 secrets.